Tuesday, June 16, 2009

my son's 1st hand-sewing project

my 3rd post and i'm already getting into crossover blogging territory...
crafting w/ my son: craft blog or his blog?

we had a rough morning so i decided to try a new special craft w/ him, sewing! he's 3 and loves arts and crafts, and also longs to do the grown-up crafts mommy does; sewing, knitting, crocheting.

often when i'm sewing, i'll get out his lace cards so he can pretend to sew. but today we went for the real deal.


i thought a simple patch that i could sew onto an item of his clothing would be just the thing. we dug through my scraps. he chose a triangle of owls on a square of orange spiderwebs, and black embroidery floss.


he decided where he wanted the triangle, and helped me pin it. then he got to work sewing, with some direction and a few suggestions from me.


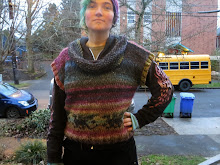
eamon placed the patch on the back of this yard sale jean jacket we had previously dyed purple


here's the finished product after i sewed it on (eamon picked the stitch)
i also straight stitched the triangle on just to make sure it held

Thursday, June 11, 2009

re-sizing fave t-shirts post baby

I have a 3 yr old, and a pile of clothes that still don't fit, but that i don't want to give up on. Especially favorite t-shirts that are just a little too tight, and a little too short.
Earlier this week I decided to do something to make my Bert & Ernie shirt more comfortable to wear.

I started by cutting it apart at the seams; sides, shoulders and sleeves.


I then dug through my bag of t-shirt scraps from other projects (I make lots of kids shirts up-cycled from used adult shirts) for something big enough to add a few inches to the sides. You could also use new knit fabric, just turn under and finish the bottom seam before sewing it to the shirt.

Figure out how much bigger you want your shirt to be, measure and cut rectangles. Pin to the side seams and sew.


I've been really into using this stitch on my home machine that simulates serging, but straight stitch or zigzag would work too.


Altering the shoulder seam is where it's especially handy to be using scraps from another shirt.
I cut a 2 in wide strip from the other shirt to match just in front of the shoulder seam, including the collar.


Here I cut away the extra folds of fabric to make my new seam less bulky.


Sew that strip in


And you end up with this


Now it just so happened in this case that the sleeves on the blue shirt were just the right size to match the enlarged armholes. So I just cut them out and pinned them into my B&E shirt. If you aren't so lucky, or are using new fabric, or want something funkier: there are many options.

Measure your armhole, and decide what you want your new sleeve to look like. You can trace the curve of it to make a traditional t-shirt sleeve.
You could cut a strip the length of the hole (as wide as you want) or longer to make it ruffley. Anywhere your sleeve creativity takes you.


And here is the finished shirt.


And though it made it easier to simply replace one sleeve w/ another, I'm thinking I may end up further altering them...

Sunday, June 7, 2009

here come the projects

ok, here i go
i decided recently that i should get w/ it and share the projects i'm working on, and create some tutorials to contribute to the open source craftiverse

coming soon:
re-sizing favorite t-shirts post baby
zipper nursing shirts
knit and crochet projects